
I am a "Do I't Yourself" kind of guy and always enjoy a good project. Due to a young and growing family I have little in the way of disposable income and therefore try to find ways to hand make many of the things I use in my outdoors adventures. I have a friend that calls me the "Martha Stewart of the Outdoors," and my wife calls these projects (and reloading/fly tying) my "man crafts." To both I say, thank you, I'll own it proudly. Although I do spend a considerable amount of time at my favorite haunts like Sportsman's Warehouse, Cabela's, Cal-Ranch, etc. I also find myself spending a good deal of time at some more unusual locations like Hobby Lobby, JoAnn's Crafts, etc. looking for materials to carry out my projects.
Here are a few of my favorite projects that have worked out fantastically for me:
Paracord Gun Sling

I was wrapping up a range session earlier this summer & I noticed the sling on my muzzleloader had come detached at the stock end of the gun. Further investigation revealed that the swivel had come completely apart and as hard as I tried I could not locate one of the pieces on or around the bench I was using. So, I hit the market for a new sling & I wasn’t finding anything that I liked in my price range. Now I could very easily just go buy a new set of swivels, pick the stitching on the straps, and have my wife re-sew the sling straps with the new swivels in place… that would just be too easy of a solution (although I will do that anyway since a new set of swivels only costs about $8).
In my internet research I found a picture of a cool sling made of paracord & have long been told of its usefulness in many random situations that may potentially arise in the field and had also spent several years at Scout Camp as a leader and always kind of admired the paracord survival bracelets that the boys would make for some of their projects. I set out to see if a guy could make a custom paracord rifle sling & found several sharp looking examples. I priced paracord and found that I could make one for good amount of money less than the slings that I liked off the shelf. That clinched it for me & off I went, searching the interweb looking at the different weaving patterns out there with YouTube tutorials that would result in a 1” wide strap (give or take). Many of the tutorials produced patterns that were on the narrow side but ultimately I found two that were wider and I thought either would work. The pattern that I chose for this rifle sling is called the "Double Solomon" and the video tutorial can be seen at http://www.boredparacord.com/pages/videos (it is video #50 on that site).
 I bought some paracord, a new set of swivels, and set up a jig from a 2x2 that would help me keep everything untangled. I found that Wal-Mart was limited in their color selection of the paracord so I went with the simple green/black color scheme figuring that it would match the black synthetic stock of my muzzleloader nicely. I have since found that Cal-Ranch and Hobby Lobby both have extensive color and pattern selections in their paracord with very competitive prices (and if you can find and print a 40% off coupon for Hobby Lobby the price then cannot be beat). It took some trial and error to get the thing started with the color pattern that I wanted... I wanted black to be the primary color with green being the accent down the middle and along the egdes. Initially I was concerned that the black would be “too black” and the green would be “too green,” if that makes any sense at all…but once the pattern was established and I could see how the two colors kind of muted each other I really started to like it. I also found that the width of the strap was perfect, right in the neighborhood of 1 1/4" wide.
I completed the sling much more quickly than I anticipated and attached it to my muzzleloader for the general muzzleloader deer season. There was a bit of trial and error on the first day of carrying my gun. I wanted the sling to be long enough that I could carry my gun across my body while riding ATVs but then still be snug and comfortable when slung simply over my shoulder while hiking. I found that initially I had made the sling too long and at lunch when we returned to camp I shortened the sling by about two inches. This helped, and that evening I felt that it was much more comfortable, but still thought that shortening it more could make it even better. So back at camp for the night I further reduced it's length by another two inches. I found that length to be perfect... I could carry the gun over my shoulder comfortably and also across my back on the ATV securely. I carried my muzzleloader again on the muzzlelaoder elk hunt a couple months later and have made no further adjustments.
I am happy with the thickness of the strap, it is wide to provide distribution of the weight of the gun over a significant surface area of my shoulder when hiking and does not dig into my neck or shoulder. The color pattern looks fantastic against the black synthetic stock of my muzzleloader. The overall length of my gun sling is 31" (not including swivels). The only drawback of this type of sling is that it is not adjustable like many of the commercial slings that can be purchased, but after two full and rigorous hunts over one season I have not found this to be an issue. Few things are more rewarding than having an idea and turning that idea into reality... I love the end result.
Materials: 50' green paracord, 50' black paracord, set of rifle swivels, and a 3' piece of scrap 2x2 for the jig.
In my internet research I found a picture of a cool sling made of paracord & have long been told of its usefulness in many random situations that may potentially arise in the field and had also spent several years at Scout Camp as a leader and always kind of admired the paracord survival bracelets that the boys would make for some of their projects. I set out to see if a guy could make a custom paracord rifle sling & found several sharp looking examples. I priced paracord and found that I could make one for good amount of money less than the slings that I liked off the shelf. That clinched it for me & off I went, searching the interweb looking at the different weaving patterns out there with YouTube tutorials that would result in a 1” wide strap (give or take). Many of the tutorials produced patterns that were on the narrow side but ultimately I found two that were wider and I thought either would work. The pattern that I chose for this rifle sling is called the "Double Solomon" and the video tutorial can be seen at http://www.boredparacord.com/pages/videos (it is video #50 on that site).
I bought some paracord, a new set of swivels, and set up a jig from a 2x2 that would help me keep everything untangled. I found that Wal-Mart was limited in their color selection of the paracord so I went with the simple green/black color scheme figuring that it would match the black synthetic stock of my muzzleloader nicely. I have since found that Cal-Ranch and Hobby Lobby both have extensive color and pattern selections in their paracord with very competitive prices (and if you can find and print a 40% off coupon for Hobby Lobby the price then cannot be beat). It took some trial and error to get the thing started with the color pattern that I wanted... I wanted black to be the primary color with green being the accent down the middle and along the egdes. Initially I was concerned that the black would be “too black” and the green would be “too green,” if that makes any sense at all…but once the pattern was established and I could see how the two colors kind of muted each other I really started to like it. I also found that the width of the strap was perfect, right in the neighborhood of 1 1/4" wide.I completed the sling much more quickly than I anticipated and attached it to my muzzleloader for the general muzzleloader deer season. There was a bit of trial and error on the first day of carrying my gun. I wanted the sling to be long enough that I could carry my gun across my body while riding ATVs but then still be snug and comfortable when slung simply over my shoulder while hiking. I found that initially I had made the sling too long and at lunch when we returned to camp I shortened the sling by about two inches. This helped, and that evening I felt that it was much more comfortable, but still thought that shortening it more could make it even better. So back at camp for the night I further reduced it's length by another two inches. I found that length to be perfect... I could carry the gun over my shoulder comfortably and also across my back on the ATV securely. I carried my muzzleloader again on the muzzlelaoder elk hunt a couple months later and have made no further adjustments.
I am happy with the thickness of the strap, it is wide to provide distribution of the weight of the gun over a significant surface area of my shoulder when hiking and does not dig into my neck or shoulder. The color pattern looks fantastic against the black synthetic stock of my muzzleloader. The overall length of my gun sling is 31" (not including swivels). The only drawback of this type of sling is that it is not adjustable like many of the commercial slings that can be purchased, but after two full and rigorous hunts over one season I have not found this to be an issue. Few things are more rewarding than having an idea and turning that idea into reality... I love the end result.
Materials: 50' green paracord, 50' black paracord, set of rifle swivels, and a 3' piece of scrap 2x2 for the jig.
Portable Reloading Station

When my grandfather passed his reloading equipment down to me he did so with the caveat that I draw up a plan for a reloading bench and put it together so that I have a dedicated space for all the stuff. I drew up two fantastic plans... one a 6' long bench with upper shelves that would only require two full sheets of carefully cut plywood (or MDF) and another smaller 3' long bench with some upper shelves that would require a single sheet of plywood (or MDF). I knew that I had zero room for either bench in my own home so I approached my parents about building the bench and keeping it at their home. My mother demonstrated considerable anxiety in regards to having pounds of gun powder in her home (even though the grandfather that I speak of his her father & she grew up with this stuff all around her), so I ultimately have had to put the plans to build one of these larger benches on hold until I upgrade my place of residence. At that point I knew I had to be creative and think outside of the box. I perused the internet searching for a portable style "bench" and found a couple pictures of portable reloading "boxes." I figured that this would be the ticket for me and drew up a simple plan using Google SketchUp (a fantastic program by the way) that would utilize a single 10' length of 2x12 dimensional lumber.


With my sketch in hand I headed to the local hardware store. I picked out the best 10 foot 2x12 that I could find from the stack of lumber. I figured that I could cut the lumber easy enough with a circular saw and a straight edge, but since it was late in the evening (after 9pm if I remember correctly) there was very little traffic in the store. I approached one of the employees there in the lumber area and asked if they would have time to do me a favor. I described what I was doing & that I generally lacked the equipment to quickly cut the lumber into the pieces I need and asked if he would be so kind as to cut it for me quickly on their professional equipment. With a little reluctance he obliged and within a matter of minutes I was at the register with a small stack of cut lumber ready to head home and put this thing together. Since the gentleman cut the wood for me as a favor I made a decision on the fly to simplify the side pieces and not cut them on an angle... I figured since I was getting it cut for free that I wouldn't push the issue and try asking for too much!
This is the actual cut diagram that I used:

The rough cut pieces were as follows:
- 2 pieces that are 24" in length and the full width of the dimensional lumber
- 1 piece that is 24" in length and trimmed to 8" wide
- 2 pieces that are 7" in width and as long as the full width of the dimensional lumber
- 1 piece that is 6" in width and as long as the dimensional lumber
- the 24"x3.5" piece and the remaining couple inches of the 2x12 are scrap
I used 3 1/2" wood screws to bring everything together. I also bought a couple packages of the stick on felt pads and a pair of heavy duty handles. Assembling the box was pretty self explanatory, the design was very simple & it came together in about 20 minutes. I placed felt pads on the back and bottom of the box so that it wouldn't mar the kitchen table (which has been my primary location for reloading) when set up to reload or when I lay it down to store my equipment like an actual box laying on it's back.
Once I got all the equipment mounted onto it I decided to forego the notch that I had originally designed for where I wanted the press. If I were to put a notch there then I would run into issues with the handle of the press hitting the bottom edge of the box and I'd lose full range of motion on the ram of the press.
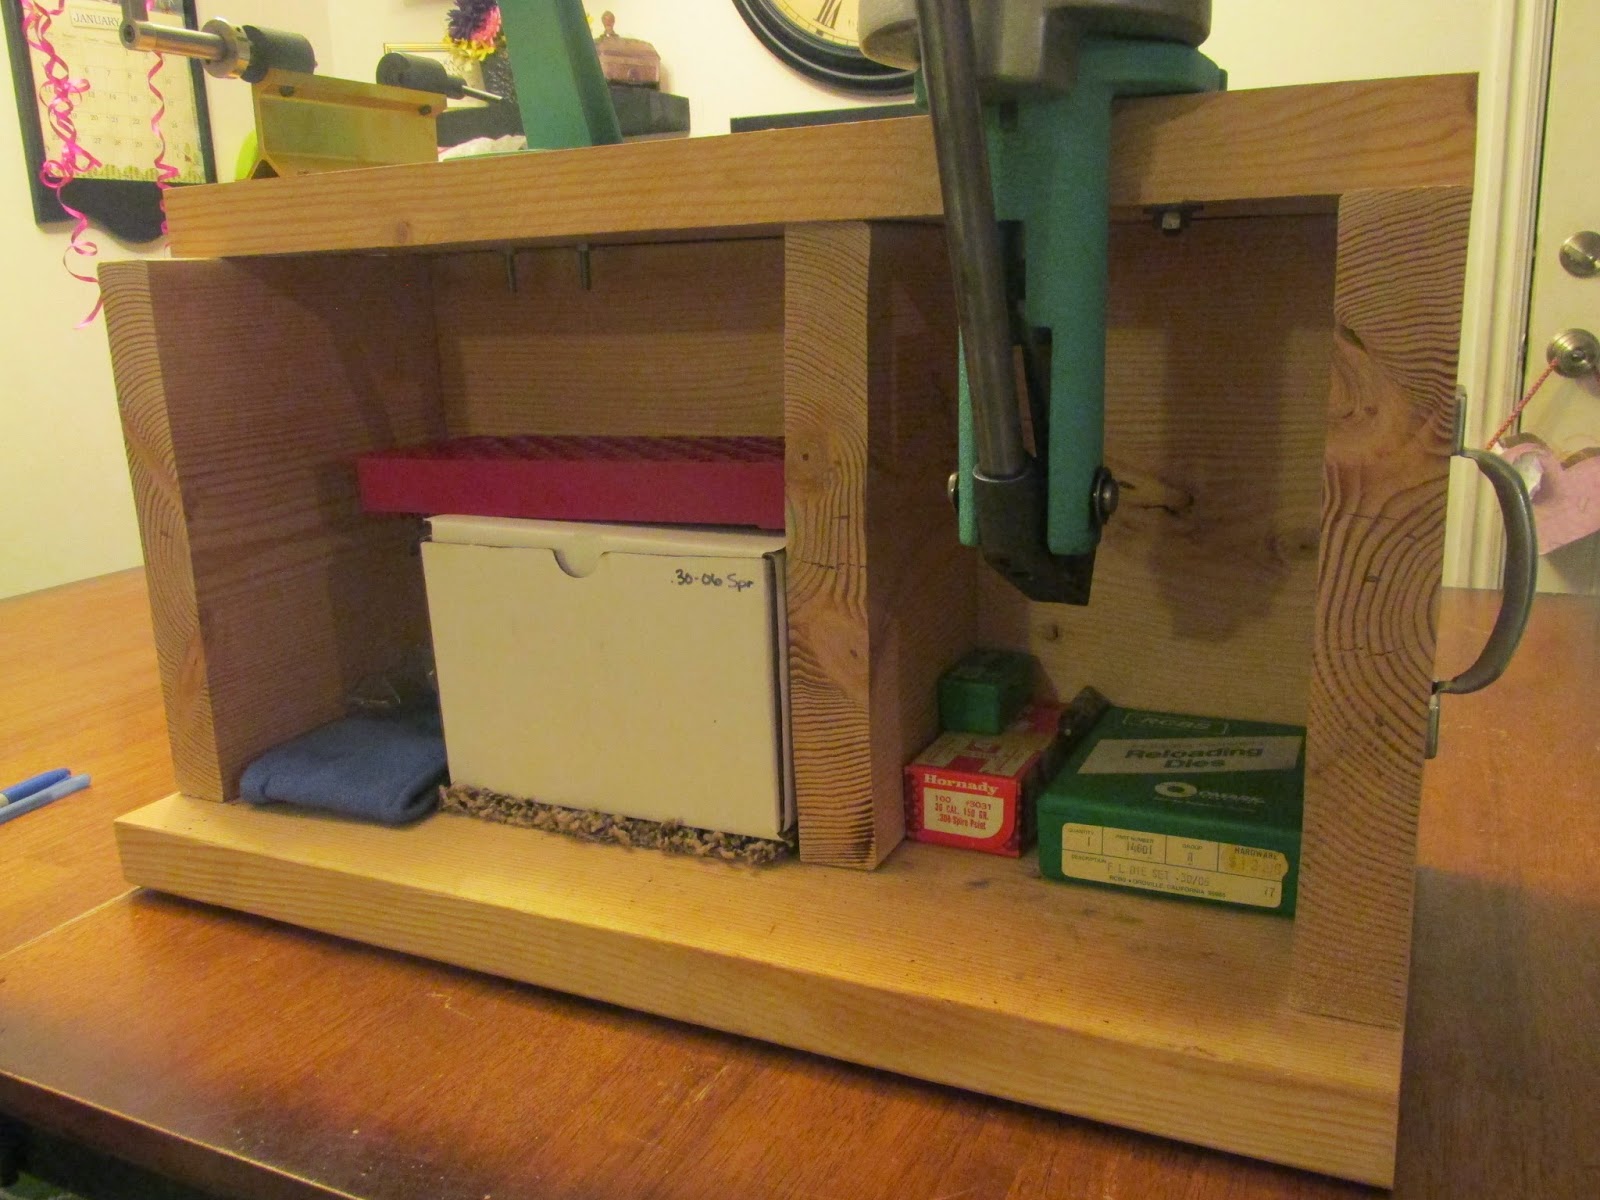
It's the perfect setup for me currently, in a space starved home with little extra space this box fits just perfectly underneath my bed when laid on it's back. And when laid on it's back it is just the perfect place to store the powder throw, case trimmer, and press when not in use.


It is definitely heavy and is perfectly adequate for the occasional reloading that I do. The only drawback that I did not foresee is that the felt pads allow the box to slide around on the table and in the resizing phase of reloading I need to strategically add my body weight to minimize the sliding. When I am pushing the brass up into the die to resize it is necessary for me to lean on the top of the box to keep it from sliding, you can see a slight discoloration just behind the press on the top and back of the box... this is where I typically place my left hand and lean across the top of the box with my foream. The discoloration is from the case lube that is on my hand from lubricating the brass. On the ram's downstroke I then move my left hand from the top of the box to the front bottom of the box right in front of the center brace, and you can see a slight discoloration there from the residual case lube that gets on my hand during the process.
The greatest thing about this is that all of my equipment is 100% mobile. I have taken all my gear to the family cabin to reload some bullets for friends while on a hunt. We would hunt all day then when we returned in the evening we would reload bullets after dinner while watching movies and joking about the days events. I've also helped a friend or two get started reloading and been able to take my stuff to their house and work along side them as they have learned the beginning processes. I could take my equipment to the range and load up test loads on the fly if needed. I also enjoy putting the box on the floor of the living room and doing the depriming phase while sitting on the floor watching TV with my wife.
Another project that has given me a considerable amount of satisfaction.


With my sketch in hand I headed to the local hardware store. I picked out the best 10 foot 2x12 that I could find from the stack of lumber. I figured that I could cut the lumber easy enough with a circular saw and a straight edge, but since it was late in the evening (after 9pm if I remember correctly) there was very little traffic in the store. I approached one of the employees there in the lumber area and asked if they would have time to do me a favor. I described what I was doing & that I generally lacked the equipment to quickly cut the lumber into the pieces I need and asked if he would be so kind as to cut it for me quickly on their professional equipment. With a little reluctance he obliged and within a matter of minutes I was at the register with a small stack of cut lumber ready to head home and put this thing together. Since the gentleman cut the wood for me as a favor I made a decision on the fly to simplify the side pieces and not cut them on an angle... I figured since I was getting it cut for free that I wouldn't push the issue and try asking for too much!
This is the actual cut diagram that I used:

The rough cut pieces were as follows:
- 2 pieces that are 24" in length and the full width of the dimensional lumber
- 1 piece that is 24" in length and trimmed to 8" wide
- 2 pieces that are 7" in width and as long as the full width of the dimensional lumber
- 1 piece that is 6" in width and as long as the dimensional lumber
- the 24"x3.5" piece and the remaining couple inches of the 2x12 are scrap
I used 3 1/2" wood screws to bring everything together. I also bought a couple packages of the stick on felt pads and a pair of heavy duty handles. Assembling the box was pretty self explanatory, the design was very simple & it came together in about 20 minutes. I placed felt pads on the back and bottom of the box so that it wouldn't mar the kitchen table (which has been my primary location for reloading) when set up to reload or when I lay it down to store my equipment like an actual box laying on it's back.
Once I got all the equipment mounted onto it I decided to forego the notch that I had originally designed for where I wanted the press. If I were to put a notch there then I would run into issues with the handle of the press hitting the bottom edge of the box and I'd lose full range of motion on the ram of the press.
It's the perfect setup for me currently, in a space starved home with little extra space this box fits just perfectly underneath my bed when laid on it's back. And when laid on it's back it is just the perfect place to store the powder throw, case trimmer, and press when not in use.


It is definitely heavy and is perfectly adequate for the occasional reloading that I do. The only drawback that I did not foresee is that the felt pads allow the box to slide around on the table and in the resizing phase of reloading I need to strategically add my body weight to minimize the sliding. When I am pushing the brass up into the die to resize it is necessary for me to lean on the top of the box to keep it from sliding, you can see a slight discoloration just behind the press on the top and back of the box... this is where I typically place my left hand and lean across the top of the box with my foream. The discoloration is from the case lube that is on my hand from lubricating the brass. On the ram's downstroke I then move my left hand from the top of the box to the front bottom of the box right in front of the center brace, and you can see a slight discoloration there from the residual case lube that gets on my hand during the process.
The greatest thing about this is that all of my equipment is 100% mobile. I have taken all my gear to the family cabin to reload some bullets for friends while on a hunt. We would hunt all day then when we returned in the evening we would reload bullets after dinner while watching movies and joking about the days events. I've also helped a friend or two get started reloading and been able to take my stuff to their house and work along side them as they have learned the beginning processes. I could take my equipment to the range and load up test loads on the fly if needed. I also enjoy putting the box on the floor of the living room and doing the depriming phase while sitting on the floor watching TV with my wife.
Another project that has given me a considerable amount of satisfaction.
Speed Loaders for Ultra-cheap

Not only do I enjoy a good project... I also enjoy finding cheap alternatives to the commercial products that are out there. Over the last several years most of the hunting that I have done has been with a muzzleloader. When I first started I bought a starter kit from Cabela's that came with three T/C Mag Quick Shot Speedloaders.
I shoot a standard 2 pellet load instead of a three pellet magnum load so when I carried these speedloaders on the first two hunts they rattled around in my pocket and the pellets were converted to powder after a day or two of hiking around. I decided that I could do better so I began looking around to improvise a better speedloader. That kit came with three tubes of bullets & I figured if those tubes held the bullets so well that they could also make a decent simple speedloader if cut to the appropriate length. I put a bullet and two pellets into each tube to determine the length that I wanted to cut them. They worked perfectly for the last 4+ years, until I lent a friend one to carry during the deer hunt and lost two on the elk hunt.
 Those tubes worked so well that I was determined to find something similar as a replacement. I was able to finally find simple clear "bead storage tubes" at Hobby Lobby that were a perfect solution (http://shop.hobbylobby.com/products/6-piece-small-storage-tubes-187187/). I printed off a 40% off coupon, headed to the store, and walked out there of with a 6 pack of new "speedloaders" for $1.91. I measured & cut them as I had before & now have a fully replenished stock of speedloaders all for under $2! The picture at right shows a measured and cut plastic tube next to an uncut tube. These tubes probably wouldn't work for a magnum three pellet load becaue that third pellet would make the load too long.
I love these speedloaders... they are small, discrete, and quiet. Plus I know that at the cost that I can now find them at Hobby Lobby that I won't be breaking the bank when I lose these and need to buy more. A quick note though... finding them in the store (look back by the beads, parachord, and leatherwork stuff) seems to be hit & miss... but at least I know where to go to look for them. Of course, you could always just buy them online and have them shipped to your home using the online 40% off coupon.
Blue Jean Sandbags

I've noticed that at some of the ranges that I frequent that the shooting blocks they have are just not very comfortable for me. I thought about buying a set of sandbags but didn't like the price point. I turned again to the internet and found several mentions of homemade sand bags made of old denim. Some examples were as simple as filling the pantleg with sand and tying off the ends, something resembling a large denim Tootsie Roll. But, again, I wanted to create something with a little more creativity and ingenuity involved. I also knew that my wife is a talented seamstress and would be able to help out where my sewing skills would be seriously lacking. My wife had saved several pairs of my old beat up jeans for a project of hers so I confiscated one of the better pairs for this project of my own. My inspiration came from a set of Caldwell bags and a set of Cabela's brand bags.
I prepared the denim fabric by cutting out all the seams and pockets & ended up with four chunks of denim fabric. I laid out my patterns on these four pieces of fabric. The forend bag is a 7" to 8" square with a notch cut at the top to support the barrel end. I basically based the height of this bag on the width of the fabric. The wedge bag is a wedge shaped bag that is approximately 5" high at one end and tapers to 1.5" high at the other. Both the forend bag and the wedge are 4" thick. Each elevator bag is a 6" x 8" square that is 1" thick. My wife sewed the bags for me leaving a hole just big enough to fit the end of a funnel in to fill them with the sand.
I filled the bag with washed playground sand (I had an extra bag of sand left over from filling the base of a portable basketball hoop). The washing step is typically used to clean sand for saltwater aquaruim sand (http://www.tropicalfishkeeping.com/member-submitted-articles/sand-washing-rinsing-tutorial-28436/) & I felt it would be good to remove the ultra fine particles that could potentially get through the fabric fibers. After washing the sand I spread it on a tarp on my driveway to dry in the hot summer sun. After drying I used a funnel to fill the bags.
The bags take more sand than I expected but after a couple tries I finally got the fill to where I wanted it. My wife showed me how to stich the bags closed by hand and I sewed them shut.
From one pair of 34x34 jeans I was able to make the forend, wedge, and three elevator bags.


.jpg)